Wednesday, December 17, 2008

Advent Activity: Making Christmas Cookies

Tonight we had a very sweet, very colorful, very messy Christmas cookie party for the kiddos. I had never done one of these before and it was hysterical. What, you mean you give a bunch of four-year-olds nothing but sugar for two hours and screaming chaos will ensue? Hmmm. Should have seen that one coming. It was great though, and worth the mess. Earlier today, Big B and I talked about what it means to be a good host. I couldn't help a bit of beaming as I overheard him offer a guest some refreshment.I made these chefs' hats for the littluns. I taped the short ends of two sheets of copy paper together, accordian-folded it, cuffed the bottom inch and a half or so, and taped the seam shut. We made old-fashioned sugar cookies, molasses sugar cookies, and chocolate cookies for decorating, and a simple sugar cookie icing. We had several batches made and a ton of dough when the kids started arriving. The decorating table kept growing, with additions of sprinkles, toppings and cookie cutters from many friends. Each cookie had its own unique flair. And then there was the ultimate cookie, the sprinkle pizza. This was a collaboration that, although left to its own untimed development in the oven, came out tasting delicious. The 'crust' was made from Noni's cream-cheese sugar cookie dough, and the toppings...well, it was a free-for-all. I had planned to make ornament dough and send our friends home with hand-painted creations. I'm glad I didn't have time; one more activity might have nudged the happy partygoers right over the stimulation edge. I did have my cookie-making staples on hand: my favorite cookie sheets, parchment paper, and cooling racks.

My all-time favorite holiday cookie recipe:

HOW TO MAKE FRESH GINGER COOKIES
INGREDIENTS:

2-1/4 c. flour
1 tsp. soda
1/2 tsp. salt
2-4 T. FRESH grated ginger
3/4 c. softened butter
1 c. + 1 c. white sugar
1/4 c. Grandma's Molasses
1 egg

Combine flour, soda and salt. In a separate bowl, beat fresh ginger, butter, and 1 cup of the sugar until light and fluffy. Beat in molasses and egg. Gently fold in dry ingredients until just combined. Chill for at least one hour. Preheat oven to 350F. Roll dough into balls and roll them in the other cup of sugar. Place 2 inches apart on parchment-lined baking sheets. In my oven these take about 12-13 minutes per batch; edges should just be starting to brown, centers slightly soft. Let them rest on the cookie sheets and then remove to racks to cool. DEE-LISH.Big B has been asking every day since we unpacked the Christmas decorations if there are cookies in our Santa cookie jar. Now I can finally and happily say yes. Here's hoping your cookie jar is full.

Tuesday, December 16, 2008

Snip and Snail Featured on Tip Junkie!

I am thrilled to announce that our sweetgum balls are featured on today's post over at Tip Junkie, showcasing homemade Christmas ornaments. There are some adorable projects and fabulous ideas there as well, it's worth the visit!

Christmas Project Update: Advent Calendar

I have finished the Advent Calendar for my sister's family. It is much more traditional than the funky version I saw on the purl bee, but I love its colors. I loved making this calendar, not only because of the family I made it for, but because it was a practice in mindful sewing. I am proud to say I did not, even once, accidentally sew a pocket shut, or sew outside of a square. This project has also eradicated my fear of embroidery. The purl's tutorial on chain stitching was a big help, as was our recent road trip; all of the squares were embroidered in Alabama!

MATERIALS USED:
-1/2 yd. 100% wool felt (eucalyptus), cut into (24) 2-1/2" squares
-1/2 yd. 100% wool felt (burgundy), cut into (24) 3" squares
-1/2 yd. 100% wool felt (cream), cut into an 18" x 24" rectangle, used scraps for tabs
-1 yd. christmas print flannel backing
-burgundy embroidery thread
-eucalyptus, burgundy and cream gutermann's cotton thread
-scissors, rotary cutter, cutting mat, straight edge, pins There are so many great ideas out there for filling the little pockets; I'm not sure yet how I will fill theirs, as they will be opening them all at once, but I'd like to include family activity cards for them to put in next year's calendar (i.e. go light-seeing, string popcorn and cranberries, write a letter to Santa, etc.). I hope this becomes a beloved tradition for my niece and nephew. (S., if you're reading this, act surprised. Love you.)

Monday, December 15, 2008

Recycled Christmas: Last Year's Christmas Cards

Every year, I feel the same pang of guilt as I go to throw away the Christmas cards, then invariably give in and stash them in what is now a giant bin of cards that spans three decades. This is ridiculous. Seriously, am I ever going to read these cards again? Still, I can't bear to discard them completely, because the tradition of exchanging these well wishes is one I fully endorse. Even if you only communicate with a distant friend or relative once annually, and even if, in this day and age, you are simply stuffing a pre-addressed envelope with a digitally printed card, you still think about that person in that moment and send good energy in their direction. So this season I have decided to compromise and re-purpose those old cards, putting them to new and beautiful uses, honoring the tradition in new ways.

RECYCLED CHRISTMAS CARD ORNAMENTS
The first time I saw one of these beauties I was mesmerized, and then I found out how easy they are to make and am even more enchanted. Here is a tutorial for the 20-circle version, shown above (one of my favorite gifts last year). I tried my own with 9 circles.

RECYCLED CHRISTMAS CARD GIFT TAGS
The inside of a Christmas card gets a bad 'wrap.' The outside is shiny, sparkly, and beautifully illustrated, but the sentiment inside often gets overlooked. As I was opening last year's cards to find imagery for the ornaments, I started reading these messages and thought they'd make great gift tags. Select words that resonate with you, or simple images, and clip away. Crynfiction has made some beautiful tags to adorn her recycled wrapping, in a similar spirit.

OTHER IDEAS: Here's a great tutorial for a recycled Christmas card star, tree-topper style. Gorgeous. And my personal favorite, the Christmas Card Puzzle Game from Let's Explore.

How do you recycle your Christmas cards?

Saturday, December 13, 2008

Advent Activity: Tree Trimming, Big & Small

TREE TRIMMING, BIG: I love going to pick out a fresh tree each year. One of my favorite moments of the season is the knowing that you've found the right tree. As we were describing this to Big B on the way to our selection, we told him the tree had to "speak" to him. After years of being a Frasier Fir family, this year a new breed spoke to us: The White Pine. It has a sweet softness and density that we love, and the price was right.Some of my favorite ornaments, mostly vintage or handmade:This ornament was given to me last year, as we were busy creating our own winter nest for little b, born on the Solstice. For more holiday nesting ideas, visit A Natural Nester and check out her gorgeous wreath.
I cherish this set of handquilted ornaments, made by a dear college friend. Click here for a similar tutorial.
Papa and I have an annual tradition of exchanging ornaments, and his choice last year reflects the celebration happening in our house. I love the color palette; it adds a big spark to our tree.
Mimi often finds unusual ornaments at thrift stores, like this little forest dweller, and this adorable fruitcake bearing hostess.I am lucky enough to have a complete set of handblown glass ornaments from Somewhere Glassworks in Gainesville, Florida. Each orb is unique and crafted beautifully.This paper crane was a gift from The Laughing Monkey, who offers a tutorial and some history behind this incredible symbol.Remember the amazing yard sale day we experienced in November? This was one of my favorite finds that day. I cannot look at him without smiling.
After all of the lights, garland and ornaments were hung, I was rewarded by hanging our sweetgum balls on many a bough. The effect is just what I'd hoped for.

- - - - - - - - - - - - - - - - - - - - - - - - - - - -

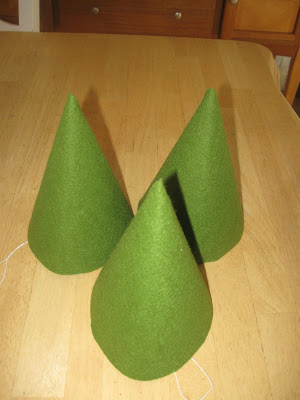
TREE TRIMMING, SMALL: I was thrilled to win a recent Crafty Crow giveaway: a download of the Kids Craft Weekly Christmas Craft Guide, a 20 pager chock-full of great ideas. Using the scrap green wool felt from the Advent Calendar project, and some leftover party hats, we adapted their cardboard trees into these adorable soft miniatures.

HOW TO MAKE PARTY HAT CHRISTMAS TREES

MATERIALS: used party hats, green felt (or paper), spray adhesive, kid-safe glue, beadsSTEP ONE: Carefully take the party hat apart so it lies flat and create a template.
STEP TWO: Using the template, cut your your felt.
STEP THREE: Spread out some newspaper and spray craft adhesive onto one side of the felt. Stick it to the outer side of the party hat, smoothing out any wrinkles.
STEP FOUR: Quickly troubleshoot any wonky areas near the 'seam.' I love craft adhesive because it adheres quickly yet is forgiving enough for repairs. The party hats we used had a tab and slot construction, so I simply lifted the felt from above the slot and inserted the tab back in. Voila.

STEP FIVE: Now comes the fun (and slightly messy) part. Using beads, sequins, foil stickers, or anything else that strikes your fancy, decorate your tree. Big B and I experimented with dabbing glue onto the tree first, then sticking on the beads; we also tried using toothpicks to pick up the beads and dip them in glue. The dab-then-stick method seemed to work best. Elmer's glue dries clear, and spills just enhance the 'snowy' effect.
THE BIG FINISH: We used a bit of poly-fill for the 'snow,' and a sweetgum ball for the star atop the decorated tree. I got this adorable incense log cabin as a gift last year, and it's right in scale. From our little house to yours, we hope you have fun trimming your trees, big and small.

Friday, December 12, 2008

Song of the South: Horses and Children

"There is something about the outside of a horse
that is good for the inside of a man."

-Winston Churchill
A piece of our winter trip to Nanny and Paw Paw's: a visit to the barn, where Nanny helps take care of 29 horses. There is something about the way these creatures speak to children that is unique, universal, and indescribable. Papa teaches Big B about the electric fence, and which wild green things the horses like to eat. Then Big B, after patience beyond measure, rides. Little b had a brief sit atop the majestic animal as well, touching it carefully, happily. It is a pleasure being a parent and watching a memory being made, feeling quite sure it will stick.
"Horses and children, I often think,
have a lot of the good sense there is in the world."

-Josephine Demott Robinson

Thursday, December 11, 2008

Advent Activity: Three Kid-Made Christmas Cards

In keeping with our handmade holiday around here, we have decided to try a few different kid-created Christmas cards. We are fortunate enough to have over a hundred cards to mail each year, so we knew the winning design would have to be equal parts lovely and easy, with a sweet injection of kid-ness.

KID-MADE CHRISTMAS CARD #1: Painted Prints
MATERIALS: one saved styrofoam tray from the grocery store, scissors, chopsticks, toothpicks, kid-safe paint, blank card paper
STEP ONE: Cut the rim off of the styrofoam tray to produce a flat piece of material.
STEP TWO: Have your child use the toothpicks, chopsticks, and any other implement that might make a deep indention, to 'draw' a picture in the tray.
STEP THREE: Paint the entire tray.
STEP FOUR: Press the tray, paint side down, onto your card paper and hold down a second or two, being careful not to move the tray. Lift up and admire!
STEP FIVE: The beauty of using the not-so-eco-friendly (yet recycled!) tray, rather than the tried-and-true potato print method, is that it really can be washed and reused over and over and over again. Simply rinse and repeat.
Big B's Design: 'A Tree in the Snow'
BENEFITS: Your child needs only enough patience to do one masterpiece, and you can reproduce it a zillion times.
DRAWBACKS: It's a bit time consuming on the parental end, and let's be honest, not everyone will know what they're looking at.
CONCLUSION: I'll resurrect this activity when Big B and little b are older.

KID-MADE CHRISTMAS CARD #2: Stamped Leaf Designs
MATERIALS: Fern leaf stamp, green ink, blank card paper
STEP ONE: Have your child use the leaf stamp to create holiday designs.
STEP TWO: Repeat step one.

BENEFITS: Easy, easy, easy.
DRAWBACKS: What child has the patience to do this over a hundred times?
CONCLUSION: Although I had illusions of six-leafed snowflakes and leafy Christmas tree designs, I loved what Big B did, and will save this activity for thank-you cards and other greetings that require only one or two iterations.

KID-MADE CHRISTMAS CARD #3: Artwork Christmas Trees
MATERIALS: Your child's artwork, scissors, craft glue, foil star stickers, blank card paper

STEP ONE: Discuss this project with your child. Let them know that you love their artwork, and this will allow their friends and family to love small pieces as well.
STEP TWO: Draw triangles (smaller than your card size) on the back of a piece of art for your child to cut.
STEP THREE: Cut triangles! I cut a bunch while Big B was cutting his.
STEP FOUR: Using the craft glue, affix a triangle to the front of your card.
STEP FIVE: Stick a star on top and marvel at the cuteness of this little tree!
BENEFITS: Your card recipients will feel special because they've each received a truly unique card. Your child will feel special because his or her art is card-worthy. You have found a creative use for some of the art collecting dust somewhere in your house because you can't bear to part with it. You are not spending any money.
DRAWBACKS: Hmmmmm....
CONCLUSION: The winner, by a long shot.

I've seen lots of Christmas cards that use cut-outs from a large piece specially created artwork, like this one I found on The Crafty Crow, using a red, green, and sparkly palette. I decided to make use of the large pile of Big B's art in my office, just waiting to shine.