Showing posts with label blockprinting. Show all posts

Friday, December 31, 2010

Block Printed Christmas Cards

Remember the sweet partridge-in-a-pear-tree linoleum block I scored at an estate sale earlier this year? To my intense delight, I found its Christmas-bells-with-holly partner at a thrift store in December. I had so much fun with these. My only expense in creating this year's cards was the paper. I used metallic silver and copper ink I had leftover from previous endeavors. I was very happy with the handmade results! I did make a fatal mistake, however; in cleaning them, I got their cork backings wet, and now the blocks are irrevocably warped. I will try to remove the linoleum and re-back them, but I am grateful they lasted through this season, and still remain beautiful blocks to admire.

Friday, July 16, 2010

Yard Sale Score: Ukulele

Could there possibly be anything sweeter than happening upon a fabulous estate sale on the way home from a fabulous morning at the beach?

I scored an antique German Little Red Riding Hood board book, a hand carved linoleum block for prints (which I am in love with and will be shown again in December, I'm sure), and a ukulele. In and of itself, a ukulele (pronounced oo-koo-lay-lay, I've recently learned) wouldn't be a big deal, but Big B was gifted one for his sixth birthday, and we are both learning to play it. Such joy to see his face light up at the prospect of us playing them together!

Thursday, December 17, 2009

Kid-Made Block Printed Gift Bags

Our oven has seen a lot of cookies in the past 48 hours, and we're not even close to being finished with our holiday baking. We did manage to make enough treats to bring to our wonderful neighbors yesterday. We needed a quick way to package up the cookies, so we grabbed some brown paper lunch bags, foam shapes, glue and glitter, and this was the result! Making the stamps was so much fun! Big B did all of the stamping and gluing and glittering while little b made our dining room table look like a snowstorm. After some silver names were added, we had some sweet little bags for our sweet friends. We'll use the stamps again (with paint) for our homemade wrapping paper, but this little batch was lovingly stuffed with our favorite fresh ginger cookies. Enjoy!

Monday, August 17, 2009

Camp B, Day Six: Day of the Arts

Today was a Camp B day I've been looking forward to all weekend. We live in a great arts community. Our city's art museum has an almost century-old collection of masterpieces from some of the world's finest artists. We have a solid local and classical music scene. We have many theaters large and small. Today, we decided to experience the arts, kid style, for Camp B, Day Six: Day of the Arts.

We set the tone properly as our chariot arrived with Mama Bird at the helm. We headed to a local wellness community for an inexpensive children's music class. Along the way our big kids named musical instruments and we introduced the idea of the groups they belong in, much like the food groups Big B liked so well last week. Rose and her monkeys met us there, and the kids got their wiggles out before heading to the museum.When we arrived at the museum, the first (and last) place we visited was this darling circus dwarf statue exhibit. The little guys were nestled among the banyan trees, much like our own little guys were.Mama Bird had the brilliant idea to visit the gift shop before we set out through the museum, and buy a handful of postcards depicting masterpieces that we'd find inside. The big kids each took a few and made it their singular mission to find 'their' paintings.Architecture is the mother of the arts, and this loggia surrounding the museum's pallatial courtyard inspires me every time I visit. The kids had a brief reprieve between museum wings to rediscover their outside voices.After a lovely picnic back at the Dwarf Garden with the rest of our village, we headed to our next destination: our family office. Grammy took the boys on their beloved golf cart ride, and Big B found this unripe baby papaya. We cut it open to examine the inside. Its unique texture plus an old office inkpad created an impromptu art project.After we got settled in back at home and dinner was cooking, we gathered the two large boxes of art we'd collected during Big B's preschool years. This was my hidden agenda for today's Camp B theme. While I can't yet bear to throw these works away, as Big B transitions to kindergarten next week, I find the need to celebrate his sweet past in an organized way, a way that will remind him of his creativity and perhaps encourage deeper creative exploration in his future. Inspired by the re-discovery of nine identical small square frames, we decided to select snippets of nine of Big B's most favorite works to create The Preschool Years Collection.
"All children are artists.
The problem is how to remain
an artist once he grows up."
--Pablo Picasso

Sunday, April 26, 2009

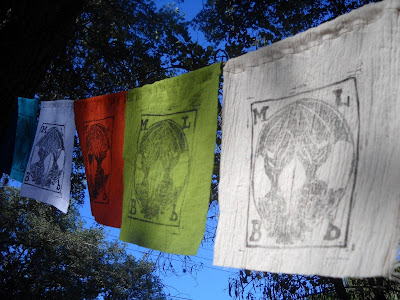
Blockprinted Prayer Flags

Friday marked the New Moon in Taurus. As we gathered, we each began creating our own interpretations of Tibetan Prayer Flags. The idea was suggested by Mama Bird, who was inspired to try some mindful crafting.

Prayer flags are visual and tactile reminders of intentions, of wishes, of prayers to be carried by the wind. I did some research, and found that there are Eight Auspicious Symbols in Buddhism. The parasol symbolizes protection, and the pair of golden fishes represent happiness, flow, and abundance. Together these symbols embody my wishes for our family in the present moment.
I found an image that spoke to me and drew a pair of similar fish, with their fins forming the lower half of a circle, and the dome of a parasol forming the upper half. In each of the four corners I drew our initials. I brought this design with me to the New Moon Circle, transferred it with carbon paper onto linoleum, and began carving the night away.After finishing the block yesterday morning, Papa and the boys accompanied me to the fabric store, where I found gauze in variations of the five traditional prayer flag colors: blue, white, red, green, and yellow, representing the elements and the Five Pure Lights. I cut the gauze into 9" squares, then applied black blockprinting ink onto my linoleum and pressed the block onto the fabric. This morning I woke up to fifteen ready and waiting dry prayer flags, which I sewed and strung up with garden twine. I had no idea where I might hang the finished flags, until I went out into the backyard this morning and remembered the two oaks from which our family hammock used to hang. The length couldn't have been more perfect, nor could the location. Each time we sit at the family table, we will look out onto our prayer flags, whispering our intentions to the wind.

Thursday, April 23, 2009

Kid-made Paper and Block Prints

In honor of Earth Day yesterday, Big E and little e (our fabulous next-door neighbors) joined us for a lot of backyard April sun-soaking, and a fun recycling project--papermaking. Loosely following this tutorial, we all worked together to make one finished piece of paper, and a big ol' fun mess.

STEP ONE: Make a frame for the paper. This time we used a wire coathanger and pantyhose.
STEP TWO: Tear a bunch of newspaper into manageable squares. Put a couple of hearty handfuls into a blender or food processor with about a cup of water.
STEP THREE: Keep adding paper and water until you have a big grey glob with no readable paper left. Mix for two more minutes.STEP FOUR: Fill a sink about 4" full with water. Add two tablespoons of glue, and the grey glob that was in your blender. Mix well with your hands, until all of the pulp dissolves. STEP FIVE: Place the wire frame at the bottom of the sink, then slowly lift it out of the water. The tutorial recommends counting to twenty to ensure slowness (and therefore more paper on the frame), but we simply drained the sink, and it worked well.STEP SIX: Hang it out in the sunshine. STEP SEVEN: Allow it to dry completely, about 24 hours or so.STEP EIGHT: Carefully peel the paper from the frame. If you wish, iron to set it and flatten it, using the highest steam setting on an electric iron.LESSONS LEARNED: Next time I think I'll use two frames sandwiching some nylon or mesh. The wire hanger was too flexible and our paper, albeit a lovely first attempt, is rather wonky. It's also on the thick side, so the mesh, or fine screen, might result in a thinner paper.

After our prideful success, I helped Big B make his very first block printing stamp, using simple foam shapes and craft glue. We talked about a symbol that might represent our two families living next door. This is what he came up with.
This was a fun project all the way around. A true collaboration, the finished result is lovely, and celebrates creating new beauty from old things. Both the newspaper and the foam shapes we used were within days of the trash can or yard sale pile; yet because of the spirit of Earth Day, they were given new life by the hands of four special little people.

Saturday, March 28, 2009

My First Linoleum Block Print

Saturday morning. Papa cooked breakfast. Children happily occupied. I could have been ________ (insert one of the following: working, cleaning, washing clothes, doing taxes). Instead, I sat in our backyard on a sunny and surpisingly windy day, developing a new obsession. Linoleum Block Printing.

I recently dusted off the blockprinting supplies Papa gave me a few birthdays ago. I have been a sucker for a nice block print ever since our honeymoon, when we visited Nashville's Hatch Show Print. Just look at these:Inspired, I sketched a simple design for an Easter card. I transferred it to the linoleum by flipping it over and tracing it, applying enough pressure to lightly transfer the design, then darkened the lines with pencil. I used a Speedball cutting handle fitted with the #3 blade (for wide, deep outline cuts) and began carving away. I finished the design with the v-shaped #2 blade and the fine #6 knife for detailing.Papa then cut me a chunk of wood to mount the finished piece, so I'd have a nice handle to apply even pressure.I put block printing ink (water soluble) onto a piece of cardstock and used a brayer to evenly distribute the ink onto the linoleum.Then, I crossed my fingers. Ta-da! It worked!
I washed the block and the brayer and tried the design with silver ink (which I love) and green ink, on all manner of paper colors and textures. The prints aren't perfect, by any means, but they are each unique and I am proud of my first attempt.

LESSONS LEARNED: The detail knife should only be used for the finest of details, no scooping. Text is tricky and next time I'll transfer the letters more accurately, and with a more uniform thickness. Toothbrushes make fabulous block cleaners. And the second print off of a fresh brayer of ink is the nicest, I think.

For a great tutorial and other posts about stampmaking with and without kids, visit Gennine's Art Blog. Simply gorgeous.